|
|
|
| | Each one of these sections includes a bunch of illustrations and screen shots so they may download a bit slowly on slow connections. |
For a single file, printable version version of these instructions, click here. Note that the file which next comes up will NOT have the menu on the left side, and may take a little while to load. |
1. |
Start the SVD control program
|
Starting the SVD control program is very easy.
It is located in the directory or folder in which you installed the software.
To start it, first go to installation folder or directory, then follow these steps.
| Windows | On a Windows PC, click on the
file SVD or SVD.exe (if you can see the file extensions).
| | Linux | On a Linux PC,
either type in the command line program SVD or
use your file manager and click on SVD.
|
When you start the SVD control program, the main screen appears.
In addition, Tips will be shown. For the purpose
of these instructions, the Tips will not be shown here.
|
2. |
Open the serial connection settings
|
For Windows, the program will immediately scan the serial ports to
see which ones are available. In Linux, no scan is done. The
first thing you must do is click on the File...
menu selection, then click on RS232 Settings....
From here on, menu selections within these instructions
will be shown using a short-hand
like
File > RS232 Settings
|
|
3. |
Choose a device & speed
|
|
Now click on the speed the works best for you. This is
normally done via trial and error. However, the speed
that works the best in almost all cases is 115200.
If you have an older PC, you may need to lower this to
57600.
And then choose the serial device you want to use. In Windows,
a valid list is shown. For Linux, you must type in the name
of the serial device that works for your system. Normally,
this name will be something like /dev/ttyS0.
|

|
|
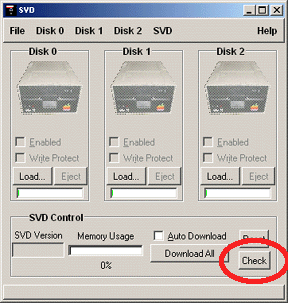
4. |
Check SVD connection
|
|
Click on OK. Make sure the SVD is connected
to the PC through the 9-pin serial cable, and check
the SVD connection by clicking on the Check
button in the bottom right corner of the control program.
The program will tell you if it can communicate with the SVD.
If it can't, there are two things you should try:
- First, make sure the SVD is turned on, and then press
the Reset button on the SVD. Then try to check communication again.
- If it still does not connect, try a different serial cable.
The cable that comes with the SVD is a straight-through
connector. The cable you are using may have pins 2 and 3 crossed.
|
|
|
|
| | Each one of these sections includes a bunch of illustrations and screen shots so they may download a bit slowly on slow connections. |
For a single file, printable version version of these instructions, click here. Note that the file which next comes up will NOT have the menu on the left side, and may take a little while to load. |
|
