|
|
|
| | Each one of these sections includes a bunch of illustrations and screen shots so they may download a bit slowly on slow connections. |
For a single file, printable version version of these instructions, click here. Note that the file which next comes up will NOT have the menu on the left side, and may take a little while to load. |
1. |
Prepare for Upload
|
The SVD can be used as a mechanism to copy your existing floppies
onto images that you can store on your PC. The general procedure
for doing this is:
- Download a blank floppy image to the SVD
- Copy a real floppy to the SVD blank image using
the vintage computer's copy routines.
- Upload the changed image back up to the SVD-CP
- Write the image to a file on the PC
Note, though, that copying an entire floppy isn't the
only way to use the SVD upload capability. Since the SVD
operates just like a real floppy drive, you can upload
single files by copying the file to the SVD and uploading
the image.
| The SVD cannot be formatted (some systems refer to
this as initializing).
So copy programs that insist on formatting the SVD image
will not work. Only copy programs that copy sector by
sector will work appropriately when copying to the SVD.
|
|
2. |
Move or Eject the existing virtual floppy
|
At this point, in this example, we assume that an image
has been downloaded to the SVD as floppy #0, and that
it has been changed either by an entire disk copy or
by any other form of writing to the image.
The first step in the upload is to clear the virtual floppy
in which the uploaded image will be placed.
This is an important step in that you will almost always
have the target virtual floppy loaded with the image that
you downloaded to the SVD.
For example,
suppose that you downloaded a blank floppy called
"blank.dsk" from virtual floppy #0 to the SVD.
You changed the image in some way by writing to the SVD
from the vintage computer.
Since the image was written as floppy #0, you
need to upload it as floppy #0.
But first you need to get the originally downloaded
floppy "blank.dsk" out of the way.
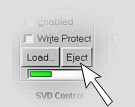
To get a floppy "out of the way" you can either:
- Click the Eject button
- Move the existing image out of the way by
swapping it with an empty virtual drive using
Disk 0 > Swap with Disk 1
.
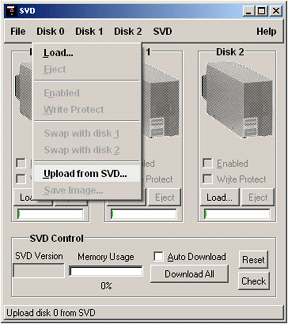
|  |
| Instead of using the menu at the top of the SVD-CP display,
you can right-click while on top of the
picture of the floppy.
This will pop-up a menu, specific to that floppy, just like the
menu in the top of the display.
|
|
3. |
Uploading
|
Once you have the target virtual floppy cleared,
you are ready to upload the changed image.
Upload is simple, either using the right-click menu
for the floppy or the top menu, choose
Upload from SVD....
When you chose it, the upload begins immediately.
| Uploads are slower than downloads.
|
| Unlike downloads,
the uploads contain a simple checksum to ensure that
the image was uploaded correctly.
|
| Uploads can be done track by track (faster) or sector by sector (slower).
You can choose your method using File > Options....
|
When an upload is complete,
the text under the floppy will read:
(upload).
|  |
|
|
|
4. |
Saving
|
After uploading, you should save the uploaded image.
Please see the next section.
|
|
| | Each one of these sections includes a bunch of illustrations and screen shots so they may download a bit slowly on slow connections. |
For a single file, printable version version of these instructions, click here. Note that the file which next comes up will NOT have the menu on the left side, and may take a little while to load. |
|
